|
| Author |
Message |
    
Ron Bowick
New member
Username: xthreaded
Post Number: 2
Registered: 01-2011
| | Posted on Saturday, January 08, 2011 - 04:37 pm: | 


|
ATLANTIC 14 hp purchased by A.E.Hickman Co. Ltd. , Cornerbrook, Newfoundland May 8, 1957.
Their first 2 cyl 14hp had the crankcase cast so the crankshaft slid in from the rear. Here is where the memory gets cloudy, I believe around 1938 they changed the crankcase so now it was split horizontally. My engine is of the newer style.
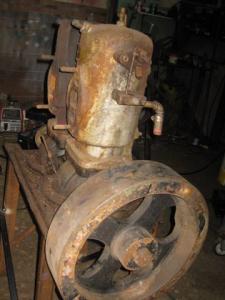
This engine came to me in a 20ft steel lifeboat, story is the life boat came off a freighter (Fruiitvale?) that hauled fruit from SA to eastern Canada About 25 years ago this lifeboat was shipped to Vancouver B.C. It then ended up in Nanaimo on Vancouver Island and was used locally as a dive boat. Too many years of salt water cooling ended it's usefull days. It was then left on the hard for several winters which were cold enough to freeze the water jackets. I acquired the engine as a total wreak. Both cylinders plus the manifold were frost split into many pieces, I thought i could braze the bits back together but found the rear cyl was corroded right through into the combustion chamber.
By putting a grease fitting into the tapping in the top of the front cyl I could pump the cyl full and push the piston out, it was stuck but finally moved. Rear cyl was siezed too but the grease started coming out through the cracked water jacket so I know it's perforated, I'll have to cut the cyl off the piston to get the rod out to reuse it.
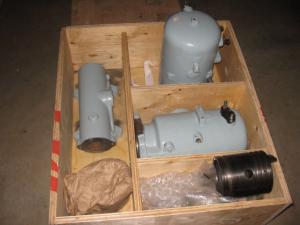
After several years of procrastination, I contacted the Lunenberg foundry, as luck would have it, they still had 2 new machined cylinders, 2 finished pistons, a unmachined manifold, and enough rings to fit both pistons. Price was not cheap but what are the chances of finding good used parts? Plus these were the last of their stock.so I was told
So it's Nov 18th 2010, I will recieve the parts sometime in Jan of 2011
Time to start cleaning the bits and getting the bottom end ready. I will have to find a coil for the ign system.
20 million items on Ebay but no primary coils when I wnat one. Guess I'll have to make one.
Making primary ign coil. 2 discs of 3/4" ply 3" in diameter cut with a hole saw. For the iron core I used #16 gas welding rod which comes in 3' lengths, by bundling about 35 pieces together with elec tape and then inserting this into apiece of plastic tubing I was able to cut the bundle into 6" lengths using an angle grinder and thin kerf cutoff grinding wheel. Cut enough to make a round core 1 1/2" in diameter. This I wrapped tightly with electrical tape leaving approx 3/16" of the core untaped at each end. I used a 1 1/2" speed bore bit to counter sink each piece of ply then epoxied these onto each end of the core. I mixed micro balloons into the cold cure epoxy to thicken it, but sawdust would have worked too.
2 days for the glue to set. One ply disc was drilled with 3/16" holes to pass the wires through,and I then patiently wound # 16 automotive electrical wire around the core. It takes about 300 lineal feet of wire to put approx 400 turns around the core. Wire was passed through the drilled hole next to the core (other hole was drilled near rim). When the windings were finished this end was passed through the rim hole. I then bound the whole winding with electrical tape. 2 terminals were epoxied to the end cap and the wires soldered to them.
This construct was reccommended to me by Chris Hawse and I must say it produces a very hot spark.
Now all I have to do is restore the engine.
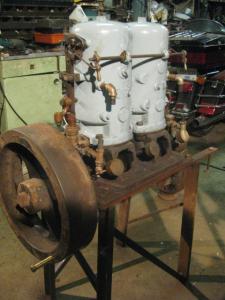
whole top end will be replaced with NOS parts from Lunenberg Foundry. ($1500.00) Worth it? I don't know. Bottom end is good , conrods and bearing babbit are in fine condition. Will be cleaning up the bits while I wait for the new stuff to arrive, probably in Jan of 2011
Well well, parts arrived Dec 22, Except for the GST cash hog, all is great. $200 taxes.
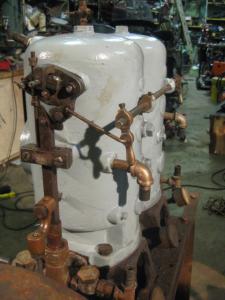
Jan 3 2011 Have been working on the motor for the last 3 days. Outer diameter of cylinders is slightly larger than the originals were. Had to grind about 1/64" off each cyl where they were touching to get them bolted down to the base. It is a bit strange how I cannot remember to get milk when I am sent to the store but 15 years later I can remember that there is a small unmarked wooden box on a shelf in the back of the barn that has some parts in it. It was a suprise when I opened the box. Inside were 2 brand new ignitors one front and one rear. Covered in surface rust but perfect condition mechanically. There were also 2 new copper seals, 2 new gaskets for the side covers, and the linkage to the front timing cam.
So yesterday was spent getting the timing sorted out and adjusted so both ignitors are tripping at the same time.
Minus 5 Celcius these days, limits how long I stay working. I'll post more pix in the next day or so.
How much retard or advance was used to start it? Guess I'll find out when I put spark to fuel and give it a spin.
Jan 4 cleaned up the crankcases, made up new base gaskets. Crank is now in all is bolted up, Jan 8 At a standstill, While fitting the rings and piston I managed to get my finger in the wristpin hole just as the piston dropped cutting the tip of my finger off. On top of that Lunenberg sent the wrong pistons (sent 6 hp ones) same bore but shorter. Now waiting on proper one as I will reuse the front cyl piston as it is in good condition.


 |
    
miro forest
Senior Member
Username: miro
Post Number: 547
Registered: 11-2001

| | Posted on Friday, January 14, 2011 - 11:56 am: | 


|
I think that you'll find that the coils that you have wound will give you a good healthy spark, but in fact it might be too healthy, that is, there is too much current going though the igniter contact points.
When the igniter contact points are closed, the circuit should have a resistance of 3 -4 ohms.
You can measure that with a digital voltmeter.
Putting too much current through the contact points will shorten their life considerably.
If you need to add some resistance to the circuit, you can use some nichrome wire that was used in the elements for hot plates. You can determine how much you need simply by measuring the resistance as you go along the length of the wire.
You're doing a wonderful ob on the motor.
miro |
    
Ron Bowick
New member
Username: xthreaded
Post Number: 3
Registered: 01-2011
| | Posted on Saturday, January 15, 2011 - 11:32 am: | 


|
Miro:
Thank you for the info re: coil resistance, I'll do a check when I am able to work with my injured hand. |
|
|
|


|


