|
| Schebler Needle Valve Mod - better |
| Author |
Message |
    
miro forest
Senior Member
Username: miro
Post Number: 1099
Registered: 11-2001

| | Posted on Saturday, August 29, 2020 - 10:04 am: | 


|
After "re-doing" the intake piping on the Schebler for my boat for better fuel flow ,
I still had issues getting the carb adjusted.
It was still tricky to start. Either it was too lean in which case it would backfire,
or it was too rich in which case it would
fire 2 or 3 times, quite and flood the engine.
The difference in the needle valve setting was about 1/8 or a turn on the needle valve.
And since the carb is now sitting near the bottom of the boat,( see pictures in previous post)
adjusting the setting while you are going was not easy or reliable.
So, what to do ?
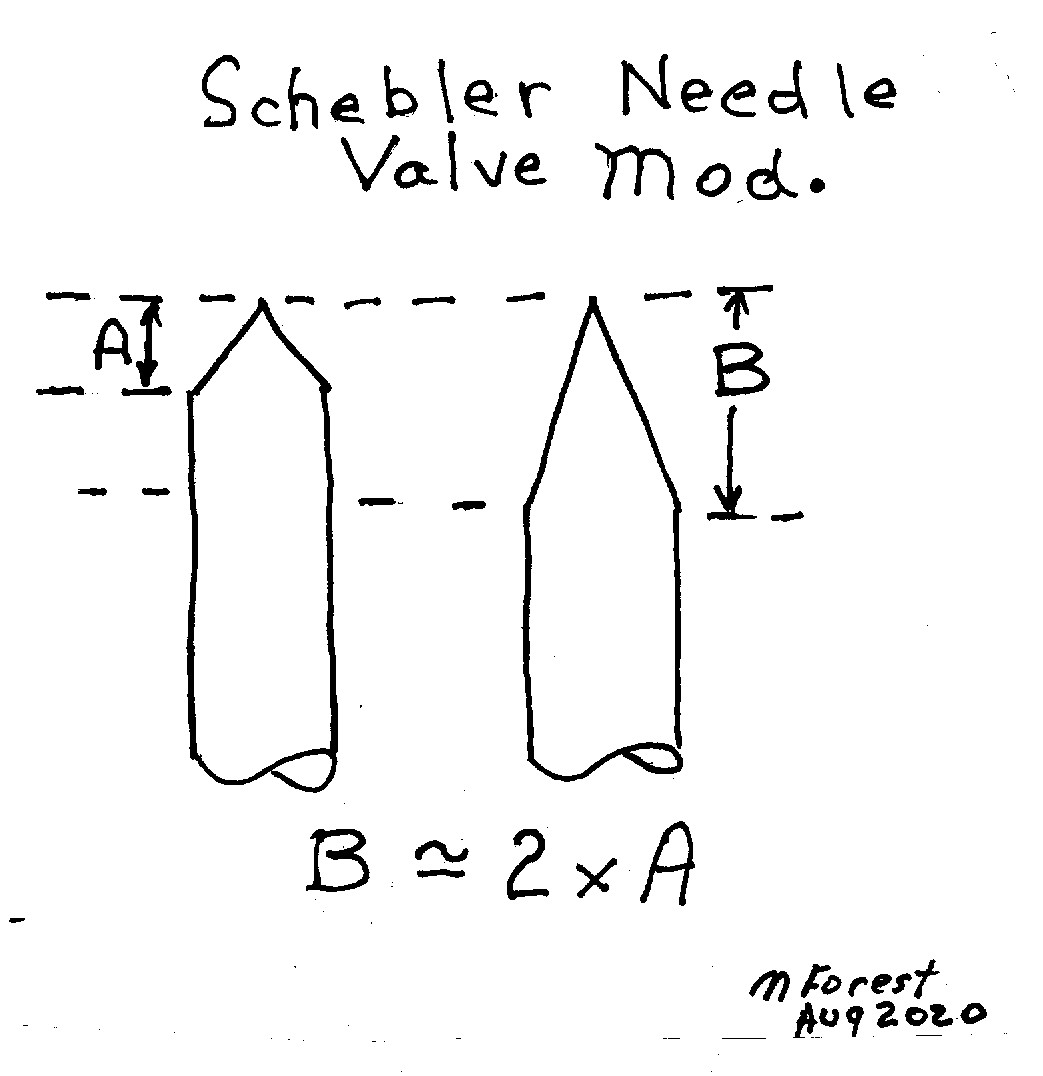
Having slept on the problem overnight , it occurred to me that
reducing the angle of the tip of the
needle valve would make the adjustment less sensitive.
The sketch shows what I did.

I carefully marked the end of the taper before changes, and marked where I wanted
the new taper to begin.
Working carefully with a small belt sander and a worn, fine belt,
I eased towards the new taper start.
After I installed the needle , I could see the
needle tip just protruding though the valve seat
when I turned the needle fully closed.
It is now much better for starting and running. It's over a 1/4 turn from starting position
to running position.
I also observed that the intake piping is very cold after running for 5 - 10 minutes
indicating that the fuel is truly vapourizing,
as well as atomizing.
It all makes the boat more fun, and less hassle.
Now I have to get better at reversing on the switch.
miro |
    
Chris Spring
Senior Member
Username: chris_spring
Post Number: 68
Registered: 02-2019
| | Posted on Tuesday, September 08, 2020 - 01:15 pm: | 


|
Hi Miro. How did you hold the needle valve while shaping it in order to get a nice consistent taper?
Asking for a friend? :-)
Cheers! |
    
miro forest
Senior Member
Username: miro
Post Number: 1101
Registered: 11-2001

| | Posted on Tuesday, September 15, 2020 - 09:12 am: | 


|
I used a very steady hand at a small belt grinder with a worn almost used up, #120 belt.
I also practised a bit on some equivalent brass rod.
Plus I avoided watching / listening to the latest news casts and cleared my mind of the current pandemic stuff.
I ended up making a simple marking jig to carefully scribe a fine "target" line for the wide end of the taper.
miro |
    
Chris Spring
Senior Member
Username: chris_spring
Post Number: 71
Registered: 02-2019
| | Posted on Wednesday, September 16, 2020 - 08:03 am: | 


|
Miro. Thanks.
Cheers! |
    
William Schaller
Senior Member
Username: billschaller
Post Number: 705
Registered: 12-2003

| | Posted on Friday, September 25, 2020 - 11:19 pm: | 


|
Depending on what tools you have, one way is to chuck it in a drill, and run the drill against the sanding belt. |
    
Chris Spring
Senior Member
Username: chris_spring
Post Number: 73
Registered: 02-2019
| | Posted on Saturday, September 26, 2020 - 11:03 am: | 


|
Thye drill chuck thing would be too easy. The needle valve has a goose neck in it for adjustment and therefore won't fit in a chuck.
I'll have to make a holder set to the desired angle. |
    
William Schaller
Senior Member
Username: billschaller
Post Number: 706
Registered: 12-2003

| | Posted on Wednesday, September 30, 2020 - 07:41 pm: | 


|
Either screw the screw part into a nut or plate to hold, or use a unimat or jewelers chuck to hold it. It would probably be pretty fun to do in unimat, Tiag, or sherline lathe. |
|
|
|


|


