| Author |
Message |
    
Dean
Visitor
| | Posted on Thursday, February 09, 2006 - 01:35 pm: | 


|
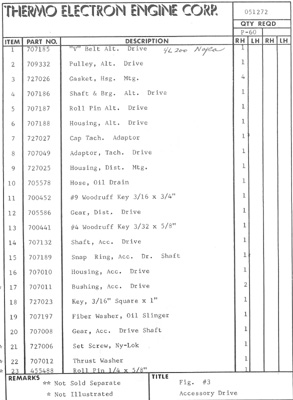
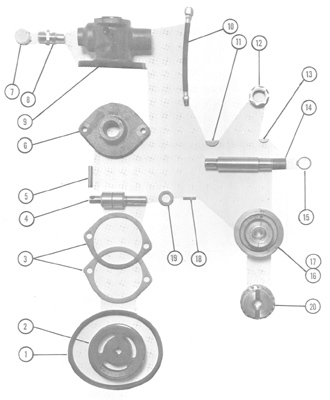
Does anyone have an IHC part number for the alternator pulley bearing, housing and shaft? I think the Palmer part number is 707186. |
    
Eddie Ross
Senior Member
Username: eddie
Post Number: 93
Registered: 04-2003
| | Posted on Thursday, February 09, 2006 - 02:06 pm: | 


|
I don't understand why you want the tractor items being that the alternator is a marine item and is different from the tractor version. Could you tell us more about what you need to do? |
    
Dean
Visitor
| | Posted on Thursday, February 09, 2006 - 04:37 pm: | 


|
This pulley drives the alternator. The bearing makes noise when it rotates, sounds like the alien ship in that '70s SciFi "UFO". I figure its wearing out and since its already off, I might as well fix it. But my marine parts store says they can't separate the bearing from the shaft. |
    
Eddie Ross
Senior Member
Username: eddie
Post Number: 94
Registered: 04-2003
| | Posted on Thursday, February 09, 2006 - 05:15 pm: | 


|
I like having starters and alternators, both automotive and marine but more so marine, rebuilt by a reputable automotive electric shop having my own component rebuilt rather than exchanged. Bearings, brushes and rewinding of armatures are common place items for these guys. Get it rebuilt by an old pro and your problems are solved. Note that the marine type alternator or starter will be different from their automotive/tractor counterparts in that they are built to shield against arcing at brushes helping to prevent possible gasoline explosion. This is required by law but is for your own safety. |
    
Dean
Visitor
| | Posted on Thursday, February 09, 2006 - 06:35 pm: | 


|
As much as I agree with what you have said, my alternator is still fine. I'm refering to the engine component that provides power to the belt. This unit is attached to the oil pump, distributor and water pump assembly. The shop I took it too sent it to a bearing specialist, who said the metal was too hard and the old bearing couldn't be removed, I would need to replace the whole shaft. |
    
Eddie Ross
Senior Member
Username: eddie
Post Number: 95
Registered: 04-2003
| | Posted on Thursday, February 09, 2006 - 07:40 pm: | 


|
OK, I misunderstood. You are still dealing with a component (water pump trim) that is a marine variation of the tractor engine. The tractor alternator is driven by a fan belt rather than the gear system as the front of the tractor engine is where the rear end of your engine is. You are going to have to obtain a serviceable unit off a scraped Palmer engine or pursue the rebuild idea further. Your bearing specialist might have another look at it or maybe someone who restores old cars, engines, ect. It might be challenging but I can't believe there isn't some way of repaairing the shaft and bearing. Keep us posted. |
    
Richard A. Day Jr.
Senior Member
Username: richardday
Post Number: 279
Registered: 11-2003

| | Posted on Thursday, February 09, 2006 - 07:58 pm: | 


|
I probably have the complete unit that drives the pulley for the alternator. It come out of the forward side of the timer drive housing. Rather than try to replace just the bearing I think I would just replace the housing shaft and pulley. What is the serial number of your P-60?? There are two.different version of the alternator drive pulley mounting. |
    
Andrew Menkart
Moderator
Username: andrew
Post Number: 543
Registered: 11-2001

| | Posted on Friday, February 10, 2006 - 10:26 am: | 


|
Dick day sent in the following pictures:
 |
    
Dean
Visitor
| | Posted on Tuesday, February 14, 2006 - 01:30 am: | 


|
The shaft turns freely about 1/8 - 1/4 turn, then binds (repeats). Here is a picture. It seems the main problem is the rolled steel pin(#5), which I am told is too hard to drill. (The pin mates with part #20.) The outer ring appears to form an oil seal seat and the inner ring is a seat for the inner bearing (Part #4 appears to be a single long bearing, or is this two?).
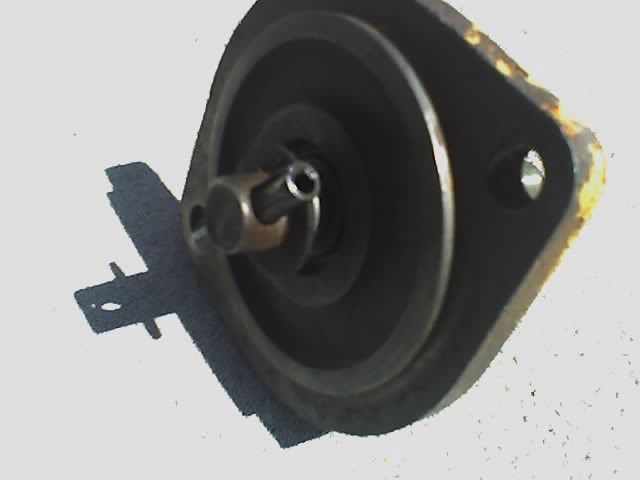
I think I will try shrinking it with clorofluoroethene (SuperCool chills to -60F), then tourch the shaft and tap it through. The pathway will then be clear to press the shaft through and pop the bearing. If this doesn't work, then I have at least a plan B.
Thank you for the offer of a used part, I will certainly consider it; but wouldn't a new bearing last longer? Is this an odd size or rare bearing? Is it unusually difficult to remove?
(I didn't see the serial number, but I believe it was assembled in 1971/2) The stamp on the housing reads 7786.
I think #20 attaches to #17/18 and #12; but I don't recall seeing part #19. Where does that belong? |
    
J.B. Castagnos
Senior Member
Username: jb_castagnos
Post Number: 88
Registered: 07-2002
| | Posted on Tuesday, February 14, 2006 - 07:17 am: | 


|
Dean, the shaft is part of the bearing, it will come as an assembly. I would grind the shaft next to the pin to release it. This style bearing is common in water pumps and idlers. John Deere riding mowers use one with a hole in the shaft, can't judge the size from the photo. Go to a John Deere dealer and ask for the bearing for the idler pulley in the mower deck, see if it matches. A bearing supply house may be able to come up with something, we have Motion Industries in our area. |
    
Richard A. Day Jr.
Senior Member
Username: richardday
Post Number: 282
Registered: 11-2003

| | Posted on Tuesday, February 14, 2006 - 12:27 pm: | 


|
Why not simply press the roll pin out. That is what I do. There are two bearing I suspect they are angular contact bearings back to back to control thrust in either directipn. |
    
Eddie Ross
Senior Member
Username: eddie
Post Number: 99
Registered: 04-2003
| | Posted on Tuesday, February 14, 2006 - 12:36 pm: | 


|
Machine shops deal with these types of problems a lot. You might want to stop into one and see what they say. You want to be as careful as possible with the disassembly so that you don't cause any added damage. |
    
J.B. Castagnos
Senior Member
Username: jb_castagnos
Post Number: 89
Registered: 07-2002
| | Posted on Tuesday, February 14, 2006 - 01:30 pm: | 


|
I didn't see the split in the pin when I first looked at the picture, it should be easily removed. |
    
miro forest
Senior Member
Username: miro
Post Number: 206
Registered: 11-2001

| | Posted on Tuesday, February 14, 2006 - 03:17 pm: | 


|
There is also a technique called Electric Discharge Machining.
Essential it is a controlled electric arc submerged in a fluid that errodes the pin away carefully and without damage to the shaft.
The trick is to find someone who has experience.
My experience with it , is to get broken taps out of blind holes. If they can do a tap, then they should be able to do your pin.
miro |
    
Richard A. Day Jr.
Senior Member
Username: richardday
Post Number: 283
Registered: 11-2003

| | Posted on Tuesday, February 14, 2006 - 08:14 pm: | 


|
If you will pay the mailing charges I will give you a good used unit that will bolt right up. You will have to make the replacement gasket. I suspect one of the ball bearing cages has collaped and that is why it no longer rotates. |
    
Richard A. Day Jr.
Senior Member
Username: richardday
Post Number: 284
Registered: 11-2003

| | Posted on Wednesday, February 15, 2006 - 05:14 pm: | 


|
These photos show the ca 1960 to 1971 Palmer supplied alternator drive pulley assembly and the CA 1971-1975 Thermo Electron version. Either is interchangeable with the other.
The Palmer version uses the classic roll pin although it does not show up in the photo as well as I would like. The other with the milled faces shows no wear on the milled portion and just slight wear on the round portions. I don't know the reason for the milled faces. |
    
Richard A. Day Jr.
Senior Member
Username: richardday
Post Number: 286
Registered: 11-2003

| | Posted on Thursday, February 16, 2006 - 11:29 am: | 


|
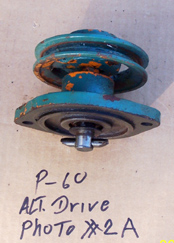
Missing photos for P-60 Alternator drive pulley assembly.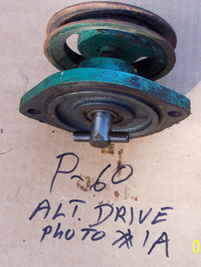
 |
    
Larry from MD.
Visitor
| | Posted on Sunday, February 19, 2006 - 11:52 am: | 


|
Dick have you tried matching those bearings with any of the ag style bearings? There are several differant gauge wheel bearings that look close. |
    
Dean
Visitor
| | Posted on Sunday, February 19, 2006 - 06:57 pm: | 


|
My pin looks like picture 1A. I sprayed it with SuperCold, it froze right up and easily tapped through. Electric Discharge Machining wasn't required in this case, and neither was grinding. Perhaps I should have tried the hammer before freezing, just to see if it was really need (now I don't know).
I'm sorry the focus was so poor in my photo, you can just barely see the spot (10 O'clock) and shadow on the outer edge, and a bright highlight at 2 o'clock (the end of the inner layer). This is a rolled steel pin. |
    
Richard A. Day Jr.
Senior Member
Username: richardday
Post Number: 295
Registered: 11-2003

| | Posted on Sunday, February 19, 2006 - 08:08 pm: | 


|
I didn't bother Larry. I have several junk P-60s and I figured just replace the whole unit was the way to get Matt back in business. By the way what is Super Cold. Never heard of it. How would it work shrinking the outer race of the wheel bearing on my lowboy. I have the new bearings and my son told me to put them in the freezer which I planned to do. Is Super Cold a spray that you buy at an auto parts house?? |
    
Dean
Visitor
| | Posted on Sunday, February 19, 2006 - 09:58 pm: | 


|
Super Cold 134 Plus
1,1,1,2,Tetrafluoroethane
MG Chemicals
Etobicoke, Ontario CAN
1-800-201-8822 http://www.mgchemical.com
It's a spray I purchased at Fry's Electronics. Recomended uses: locating thermally intermittant electronic components, PCB cracks, and cold solder joints. Protects components during soldering, freezes gum and adhesives for easy removal.
Wearing leather gloves, I sprayed through the center of the pin. This helped to chill the pin faster than the surounding shaft. I thought I would need to work the material quickly, so I had a torch close at hand (in case I needed to warm the shaft for additional separation). I didn't, I just held the housing free hand, and then realized, to pass the pin all the way through, I needed to search my toolbox quickly for a 1/4" rod (passing up all the center punches -- to avoid the cone shaped tip that might expand the lip). As it turned out, time wasn't all that critical. Two minutes or so was just fine.
Depending on how much you need to handle the metal parts, you might prefer thinsulate or greater, for protection from frostbite. The oils on the hand might provide enough moisture for the frozen metal to stick.
On a tractor motor site I read about using the freezer for installing cylinder sleeves. But I find for parts removal, temperature differental is valuable. A few years ago I had to remove an expansion clamp from inside a steel tube, I ran cold water through the inside of the tube and applied a propane torch to the outside. The clamp shells fell right out. So try to focus the spay on the race and avoid the surrounding plate. If you need to torch a half inch around the seat, gravity might be enough to pull out the race.
Super Cold might also make the job of installing cylinder sleeves proceed more quickly (definately need good gloves). Perhaps also useful for installing presure fitted bearings, if you don't have a pneumatic press available. I would freeze only the bearing and then wipe off the ice (pick a dry day). (As for seals, I might be concerned about the ruber cracking or deforming its location at such temperatures)
Pretty useful stuff for about $5. |
    
Dean
Visitor
| | Posted on Sunday, February 19, 2006 - 10:02 pm: | 


|
I meant to say "hydraulic press". I don't have one, so I might try this technique someday. |
    
Dean
Visitor
| | Posted on Monday, February 20, 2006 - 12:15 am: | 


|
It may be worthwhile to note that thermal expansion and contraction is 3 dimensional unless other forces exist. So a ring may contract more than a non-hollow or surface, and heating may tighten a surface around a surrounded metal object. Thermal propagation generally requires time, and may require more time to propate to adjacent units than from units that form a contiguous metal body. Also, different metals have differing co-efficients of expansion (or contraction), which may be leveraged to seperate differing metals. A simplified expression of the laws of theromdynamics says:
1. you can't win
2. you can't break even
3. you can't walk away from the game
The official laws are worded differently (does anyone wish to post them?). But, time can be leveraged to cheat these laws and differing metals offer more oppertuinities to cheat with cyclic application of chill and heat as appropriate. (heat surrounding metal that expands faster to lossen, chill contained metal that contracts faster to free the bond {maybe apply CorrossionX before chilling to encourage penetration of rust anti-agent) YMMV.
Anybody want to share a sucessfull experience separating stainless steel bolts from a coroded aluminium seat? I've had loads of trouble with SS in AL for years, any solutions? |
    
Larry from MD.
Visitor
| | Posted on Monday, February 20, 2006 - 12:45 pm: | 


|
Normally the front bearing races will go in with light tapping and no freezeing.Sometimes the rears are harder.Often you have to weld a bead around the inside to get the old ones out and freeze the new ones to get them in. |
    
Eddie Ross
Senior Member
Username: eddie
Post Number: 104
Registered: 04-2003
| | Posted on Monday, February 20, 2006 - 03:08 pm: | 


|
For frozen bolts WD-40 works really well. Put some on and let it soak in over night. There might be something else out there that is even better but I never saw one yet. |


